Inside Rear View Mirror
Before driving your vehicle, check to see that your inside rear view mirror is properly positioned. Adjust the rear view mirror so that the view through the rear window is properly centered.
Make sure your line of sight is not obstructed. Do not place objects on the rear seat or in the cargo area that may interfere with your vision through the rear window.
To prevent serious injury during a collision or deployment of the airbag, do not modify the rear view mirror and do not install a wide mirror.
Never adjust the mirror while driving. This may cause loss of vehicle control and result in a collision.
When cleaning the mirror, use a paper towel or similar material dampened with glass cleaner. Do not spray glass cleaner directly on the mirror as this may cause the liquid cleaner to enter the mirror housing.
2C_InsideRearViewMirrorECM
- Indicator
When the engine is running, the glare from vehicle headlamps behind you is automatically controlled by the sensor mounted in the rear view mirror.
Whenever the gear is shifted to R (Reverse), the mirror automatically goes to the brightest setting in order to improve the driver's view behind the vehicle.
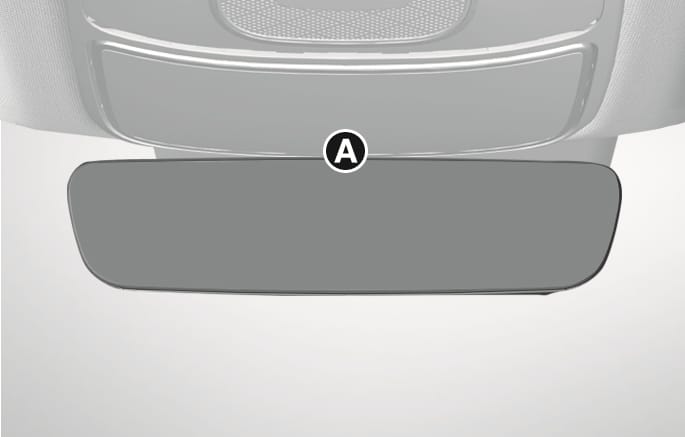
The digital center mirror is a system that uses the camera on the rear of the vehicle and displays the rear image on the screen of the digital center mirror. The digital center mirror allows the driver to see the rear view despite obstructions, such as the head restraint or luggage, ensuring rear visibility.
Be sure to read the precautions and instructions before using the digital center mirror. Failure to follow the precautions and instructions for proper use of digital center mirror may result in serious injury:
-
You are responsible for driving safely when using the digital center mirror. It is not a substitute for safe driving practices. Always check the blind spot of the digital center mirror before driving.
-
Never operate the digital center mirror while driving. This may cause loss of vehicle control and result in a collision.
-
Never disassemble or modify the digital center mirror’s camera unit or wirings.
If you notice smoke or any smell coming from the digital center mirror, stop using the system immediately. Have the system inspected by an authorized retailer of Genesis Branded products.
-
The image areas displayed in the conventional rear view mirror mode and the digital center mirror mode are different. Check the image areas displayed in different modes before driving the vehicle.
-
Switch to the conventional rear view mirror mode when the digital center mirror is not functioning normally. A light beam or flash may appear if strong light sources such as direct sunlight or vehicle headlights obstruct the rearview camera.
-
Always keep the rear view camera lens clean. If the lens is blocked or covered, the digital center mirror may not operate normally. Clean with a damp soft cloth.
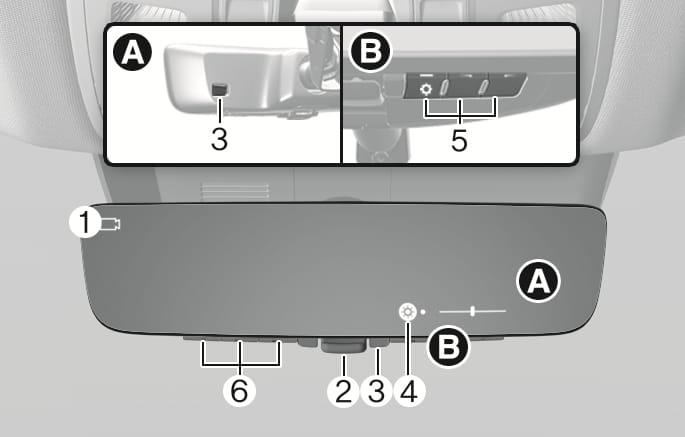
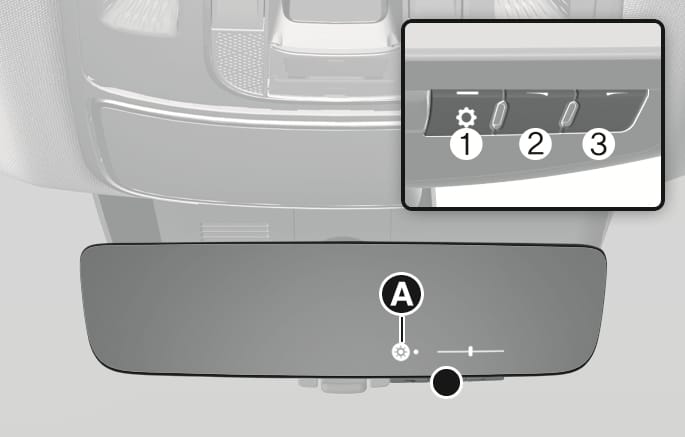
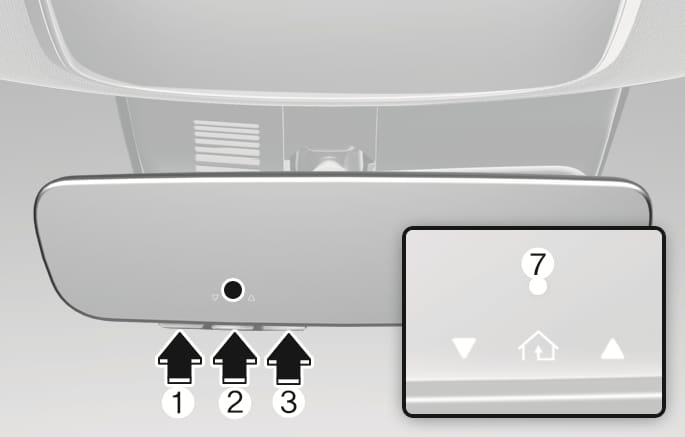
Digital center mirror components
2C_DCMInsidemirrorOverview
- Camera indicator
- Mode selection lever (conventional rear view mirror/digital center mirror)
- Sensor
- Icon display area
- Menu/Adjustment button
- HomeLink Channel
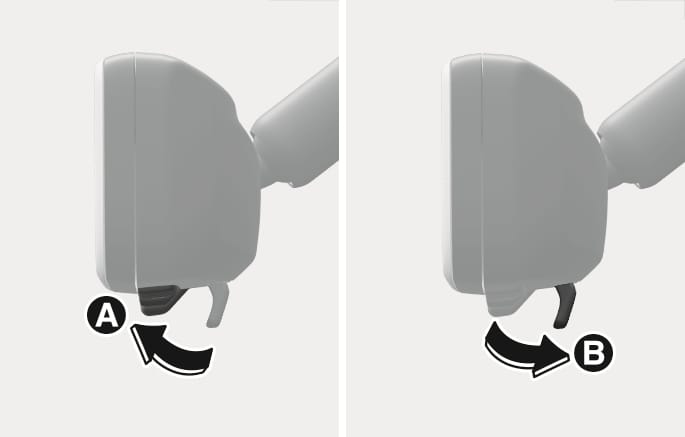
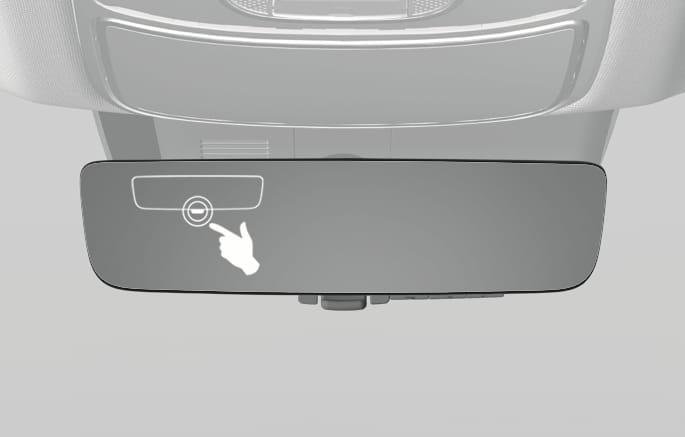
Changing modes
Pull the lever towards you to use the digital center mirror mode or push the lever towards the front windshield to use the conventional rear view mirror mode.
2C_DCMModeChange
- Digital center mirror mode
- Conventional rear view mirror mode
-
If the digital center mirror mode is selected, the rear view is shown on the inside rear view mirror and the camera (
Ɣ ) indicator appears on the top left side of the mirror. -
The digital center mirror turns on when the Engine Start/Stop button is in the ON or START position and turns off when the Engine Start/Stop button is in the ACC or OFF position.
-
The conventional rear view mirror can be used when the digital center mirror mode is turned off.
-
Use the conventional rear view mirror mode when the display of the digital center mirror mode seems blur due to strong light sources.
-
If the display is difficult to see due to reflected light, close the sunshade of the sunroof (if equipped).
-
When driving at night, the color of the objects displayed on the digital center mirror may differ from the actual color.
-
Depending on your physical condition or age, it may take longer than usual to focus on the displayed image. If this occurs, use the conventional rear view mirror mode.
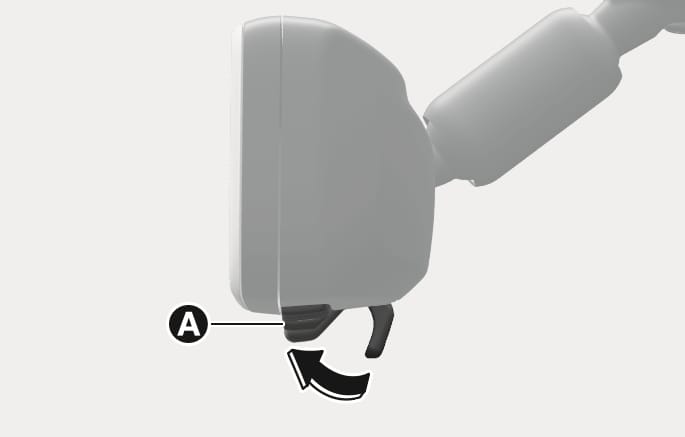
Adjusting the mirror height
Select the conventional rear view mirror mode, adjust the height of the rear view mirror so that the view through the rear window is properly centered.

2C_DCMModeHeightAdjust
Setting the digital center mirror
-
Press the Engine Start/Stop button to the ON or START position and pull the lever towards you to use the digital center mirror mode [A].
2C_DCMModeHeightAdjust_1
-
Press the menu button (1), and then press the adjustment button (2 or 3) to adjust the brightness and vertical angle of the display.
2C_DCMInsidemirrorSetting_2
-
Each time the menu button (1) is pressed the brightness (
Ń ) icon or angle (ń ) icon appears in the icon display area [A]. -
The brightness and vertical angle can be adjusted by using the adjustment button (2 or 3) when the icon is displayed.
-
If a button is not operated for about 5 seconds or more, the icon disappears, and the display cannot be adjusted.
-
Make sure the liftgate is closed before driving. When the liftgate is open, the rear image may not be displayed normally on the digital center mirror.
-
Do not let the passengers stare at the displayed image when the vehicle is being driven. It may cause motion sickness.
-
Adjust the digital center mirror to an appropriate brightness. If your eyes become tired, change the to conventional rear view mirror mode.
-
Do not block or cover the light sensors. If the light sensors are blocked or covered, the brightness may not be displayed normally.
Precautions while using the digital center mirror
-
Do not clean the mirror with cleaning agents containing thinner, benzene, alcohol, or other petroleum based cleaning products.
-
Do not contaminate the rear view camera lens with organic solvent, vehicle wax, window cleaner, or glass coating when washing the vehicle. If contaminated, wipe it off as soon as possible.
-
Clean the camera lens with a damp soft cloth. Scratching or damaging the lens surface may reduce digital center mirror performance.
-
Never disassemble or modify the digital center mirror’s camera unit or wirings, and never apply any impact on it.
-
To prevent the battery from discharging, do not use the digital center mirror when the engine is not running.
-
Do not attach an antenna of a wireless device near the digital center mirror. Electric wave from a wireless device may cause disturbed images.
-
Never rotate the body of digital center mirror more than 90 degrees or excessively press the adjustment buttons.
If you suspect a malfunction while using the digital center mirror, push the mode selection lever towards the front windshield to switch to the conventional rear view mirror mode. Have your vehicle inspected by an authorized retailer of Genesis Branded products.
2C_DCMMalfunction
-
If the error (
ł ) icon appears, the digital center mirror may not be working properly. Change to conventional rear view mirror mode. -
If the digital center mirror is extremely hot, the high temp (
Ł ) icon appears, and the display gradually becomes dimmer.-
If the temperature continues to increase, the digital center mirror turns off.
-
The icon disappears when the mirror becomes cool.
-
Your vehicle may be equipped with a Gentex Automatic-Dimming Mirror with an Integrated HomeLink® Wireless Control System.
During night time driving, this feature will automatically detect and reduce inside rear view mirror glare. The HomeLink® Universal Transceiver allows you to activate your garage door(s), electric gate, home lighting, etc.
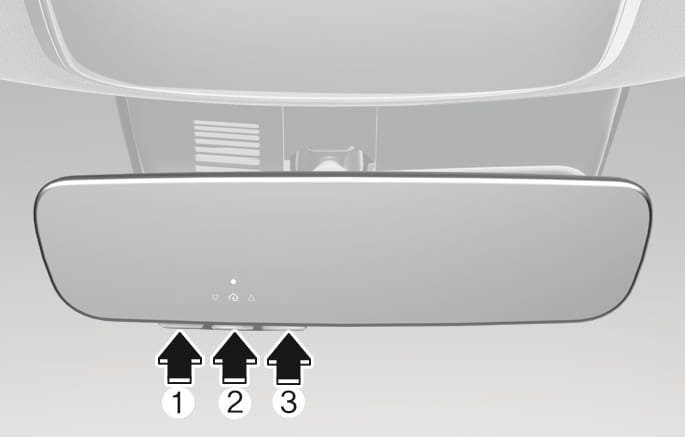
2C_ECMHomelink
- HomeLink Channel 1
- HomeLink Channel 2
- HomeLink Channel 3
- Garage Door Opener Status Indicator: Closing or Closed
- HomeLink Operation Indicator
- Garage Door Opener Status Indicator: Opening or Opened
- HomeLink User Interface Indicator
Automatic-Dimming Night Vision Safety™ (NVS®) Mirror
The NVS® Mirror automatically helps reduce glare by monitoring light levels in the front and the rear of the vehicle. Any object that obstructs either light sensor will degrade the automatic dimming control feature.
For more information regarding NVS® mirrors and other applications, please refer to the Gentex website:
www.gentex.com
Your mirror will automatically dim upon detecting glare from the vehicles traveling behind you.
The mirror defaults to the ON position each time the vehicle is started.
Integrated HomeLink® Wireless Control System
The HomeLink® Wireless Control System provides a convenient way to replace up to three handheld radio-frequency transmitters used to activate compatible devices such as gate operators, garage door openers, entry door locks, security systems, and home lighting.
HomeLink® operates while the Engine Start/Stop button is in the ACC or ON position for safety reasons. It is to prevent unintentional security problems from happening when the vehicle is parked outside the garage.
Before programming HomeLink® to a garage door opener or gate operator, make sure people and objects are out of the way of the device to prevent potential harm or damage. Do not use the HomeLink® with any garage door opener that lacks the safety stop and reverse features required by U.S. federal safety standards (this includes any garage door opener model manufactured before April 1, 1982). A garage door that cannot detect an object - signaling the door to stop and reverse - does not meet current U.S. federal safety standards. Using a garage door opener without these features increases the risk of serious injury or death.
For more information, contact HomeLink® at www.homelink.com, or call Home-Link customer support at 1-800-355-3515.
It is also recommended that a new battery be replaced in the handheld transmitter of the device being trained to HomeLink® for quicker training and accurate transmission of the radio frequency.
1. Programming HomeLink®
The following steps show how to program HomeLink. If you have any questions or are having difficulty programming your HomeLink buttons, refer to the HomeLink website or call the HomeLink customer support toll-free number. Do this, before going back to the dealer who sold you the vehicle.
-
Visit the HomeLink website at: www.homelink.com. Then at the top of the page, choose your vehicle make. Then watch the You Tube video, and/or access additional website information.
-
If you choose to access the website via your cell phone, scan the QR code.

2C_ECMHomelinkQR
-
Or, call HomeLink customer support at 1-800-355-3515 (Please have your vehicle maker/model AND the opener device maker/model readily available.)
1) Programming Preparation
2C_ECMHomelink_2
-
When programming a garage door opener, it is advised to park the vehicle outside of the garage.
-
It is recommended that a new battery be placed in the handheld transmitter of the device being programmed to HomeLink for quicker training and accurate transmission of the radio-frequency signal.
-
Press the Engine Start/Stop button to the ACC (Accessory) position for programming of HomeLink.
2) Programming a New HomeLink®
2C_ECMHomelink_3
-
Press and release the HomeLink button (1), (2) or (3), you would like to program. The HomeLink indicator light (7) will flash orange slowly (if not, perform the steps of "Erasing HomeLink Buttons" section, and start over).
Type A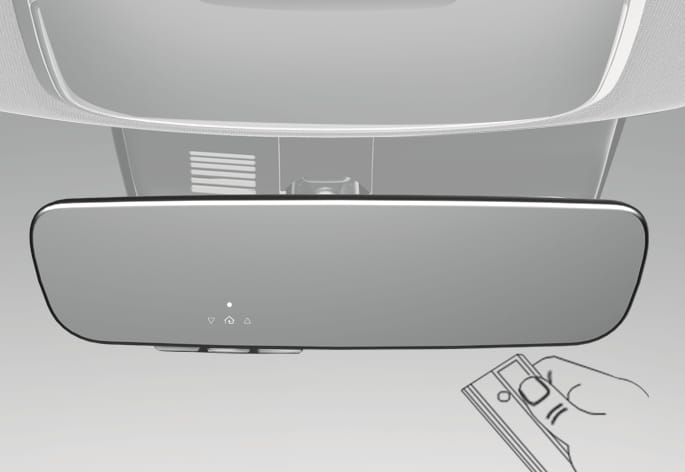
2C_ECMHomelink_4
Type B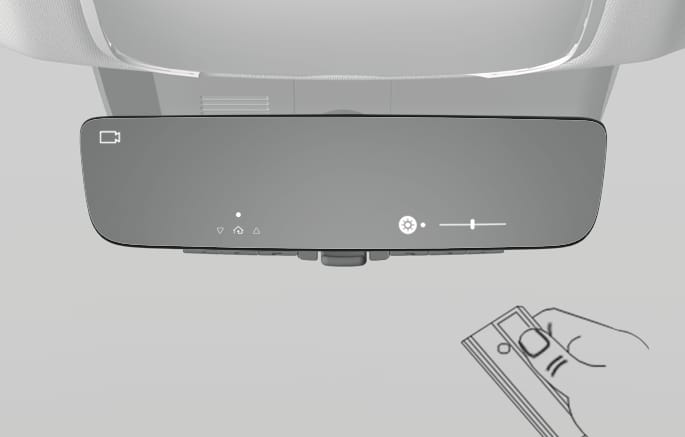
2C_ECMDCMHomelink_4
-
Position the garage door opener remote 1–3 inches (2–8 cm) away from the HomeLink buttons.
-
While the HomeLink indicator light (7) is flashing orange, press and hold the handheld remote button. Continue pressing the handheld remote button until the HomeLink indicator light (7) light changes from orange to green. You may now release the handheld remote button.
-
Wait until your garage door comes to a complete stop, regardless of position, before proceeding to the next steps.
-
Press and release the HomeLink button you are programming and observe the indicator light.
-
If the indicator light remains solid green, your device should operate when the HomeLink button is pressed. At this point, if your device operates, programming is complete.
-
If the indicator light rapidly flashes green, firmly press, hold for two seconds and release the HomeLink button up to three times in a row slowly to complete the programming process. Do not press the HomeLink button rapidly. At this point if your device operates, programming is complete. If the device does not operate, continue with step 6.
-
-
At the garage door opener motor, (security gate motor, etc.) locate the "Learn", "Smart", "Set" or "Program" button. This can usually be found where the hanging antenna wire is attached to the motor-head unit (see the device's manual to identify this button). The name and color of the button may vary by manufacturer.
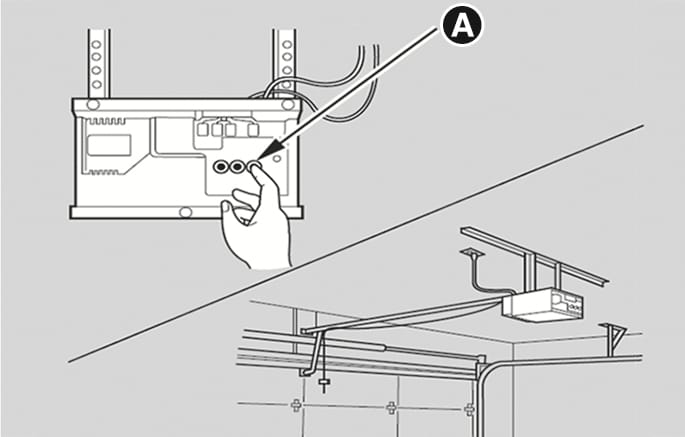
2C_ECMHomelink_5
- Learn button
-
A ladder and/or second person may simplify the following steps.
-
Firmly press and release the "Learn", "Smart", "Set" or "Program" button. You now have up to 30 seconds in which to complete the next step.
-
Return to the vehicle and firmly press, hold for two seconds and release, the HomeLink button up to three times in a row slowly. Do not press the HomeLink button rapidly. As soon as you see the garage door start to move, stop pressing any buttons until a few seconds after the garage door has come to a complete stop, regardless of position. At this point, programming is complete and your device should operate when the HomeLink button is pressed and released.
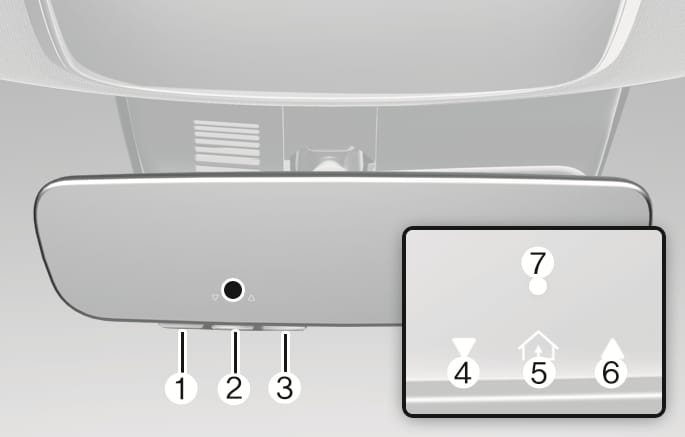
3) Two-Way Communication Programming (For select garage door openers)
If your garage door opener has the 'myQ' logo on its side, your opener likely has Two-Way Communication capability. HomeLink has the capability to establish Two-Way Communication with your garage door opener. HomeLink can receive and display "closing" or "opening" status messages from compatible garage door openers. At any time, Home-Link can also recall and display the last recorded status communicated by the garage door opener to indicate your garage door being "closed" or "opened".
To check if your garage door opener is compatible with this feature, refer to www.homelink.com/compatible/two-way-communication. If your garage door opener has this functionality, AND the Two-Way Communication indicators (4), (6) in the mirror appear while the garage door is opening/closing, then no further steps are needed. Two-Way Communication Programming is already complete. However, if your garage door opener has this functionality, AND the Two-Way Communication indicators (4), (6) in the mirror DO NOT appear while the garage door is opening/closing, use the following instructions to enable this functionality.
-
In your vehicle, press and hold the programmed HomeLink button for 2 seconds, then release. Confirm that the garage door is moving. AFTER it stops, you will have one minute to complete the following steps:
-
A ladder and/or second person may simplify the following steps.
-
-
On your garage door opener in your garage, locate the "Learn" button (usually near where the hanging antenna wire is attached to the garage door opener). If there is difficulty locating this button, reference the device's owner's manual.
-
Press and release the "Learn" button.
-
A light on your garage door opener may flash, and your Two-Way Communication indicators (4), (6) in your vehicle may flash, confirming completion of the process.
-
Return to the vehicle and firmly press and release the programmed HomeLink button to activate your garage door. The Two-Way Communication indicators (4), (6) flash in orange when the door is moving. Do not make any additional button presses until AFTER the garage door has come to a complete stop.
-
Your Two-Way Communication programming is now complete.
If your garage door opener has Two-Way Communication functionality, it is possible for HomeLink to stop functioning the garage door shortly after initial programming, IF the Two-Way Communication Programming wasn't properly completed. This usually happens after the first 10 times a programmed HomeLink button is pressed. If you experience this, completing the "Programming a New HomeLink Button" and "Two-Way Communication Programming" will restore door operation.
4) Canadian Programming
Canadian radio-frequency laws require transmitter remote signals to "time-out" (or quit) after a couple seconds of transmission, which may not be long enough for HomeLink to pick up the signal during programming.
If you live in Canada or you are having difficulties programming a gate operator or garage door opener by using the programming procedures, replace "Programming a New HomeLink Button" step 3 with the following:
While the HomeLink indicator light (7) is flashing orange, press and release ("cycle") your device's handheld remote every two seconds until the HomeLink indicator light (7) changes from orange to green. You may now release the handheld remote button. Then proceed with "Programming a New HomeLink Button" step 4.
2. Operating HomeLink®
1) Operating HomeLink®
2C_ECMHomelink_3
-
Press and release the desired programmed HomeLink button (1, 2 or 3).
The HomeLink indicator (7) should light green, solid or flashing, and your programmed device should operate.
If your device does not operate, the HomeLink programming was not successful, and you'll need to reprogram the button.
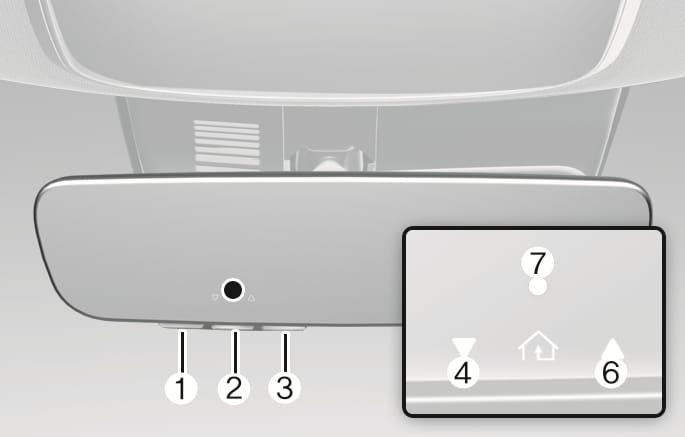
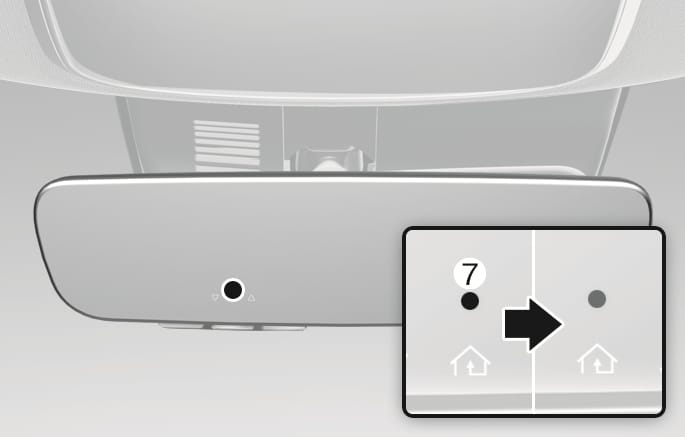
2) Two-Way Communication Display Behavior
2C_ECMHomelink_6

2C_ECMDCMHomelink_6
-
Press and release one of the programmed HomeLink buttons (1, 2 or 3).

2C_ECMHomelink_7
-
The indicator (4) and (6) operates as below, if your garage door opener has Two-Way Communication functionality.
-
If the indicator (4) flashes in Orange, it indicates that the garage door is "Closing".
-
The indicator (4) turns solid green once the garage door has closed.
-
If the indicator (6) flashes in Orange, it indicates that the garage door is "Opening".
-
The indicator (6) turns solid green once the garage door has fully opened.
-
If the indicator (4) or (6) does not turn to green, it indicates that the last status of garage door was not received properly. The HomeLink mirror tries to receive the last known status of the garage door for a few seconds.
-
3) Recalling Garage Door Status
HomeLink mirror with Two-Way Communication provides a way to view the last stored message from the garage door opener. In order to recall the last known status of the last activated device, press the buttons "1 and 2" OR "2 and 3" simultaneously.
-
If the indicator (4) appears solid Green, it indicates that the last activated device was "closed" properly.
-
If the indicator (6) appears solid Green, it indicates that the last activated device was "open" properly.
3. Erasing HomeLink® Buttons
1) Erasing and Reprogramming a Single HomeLink® Button:
-
Press and hold the desired HomeLink button you want to re-program. DO NOT release the button.
-
The HomeLink indicator light (7) will illuminate solid green. Release the button as soon as the HomeLink indicator light (7) begins to flash orange, usually about 20 seconds.
-
Proceed with the steps in the "Programming a New HomeLink Button" section.
If you do not complete the re-programming of a new device to the button, it will revert to the previously stored programming.
2) The following instructions will erase ALL HomeLink® programming from ALL buttons:
2C_ECMHomelinkDelete
-
Press and hold the buttons (1) and (3) simultaneously.
-
The HomeLink indicator light (7) will illuminate solid Orange for about 10 seconds.
-
Release the buttons once the HomeLink indicator light (7) changes to Green and flashes rapidly.
-
Now all three HomeLink buttons (1), (2) and (3) are cleared of any programming.
HomeLink® and the HomeLink® House logo are registered trademarks of Gentex Corporation.
The myQ logo is a registered trademark of The Chamberlain Group, Inc.
FCC (USA) and ISED (Canada)
This device complies with FCC rules part 15 and Innovation, Science, and Economic Development Canada RSS-210. Operation is subject to the following two conditions: (1) This device may not cause harmful interference, and (2) This device must accept any interference that may be received including interference that may cause undesired operation. WARNING: The transmitter has been tested and complies with FCC and ISED rules. Changes or modifications not expressly approved by the party responsible for compliance could void the user's authority to operate the device.
This equipment complies with FCC and ISED radiation exposure limits set forth for an uncontrolled environment. End Users must follow the specific operating instructions for satisfying RF exposure compliance. This transmitter must be at least 20cm from the user and must not be co-located or operating in conjunction with any other antenna or transmitter.
FCC (Htats-Unis) et ISED (Canada)
Cet appareil est conforme aux règlements de la FCC, section 15, et au CNR-210 d'Innovation, Sciences et Dhveloppement économique Canada. Le fonctionnement est assujetti aux deux conditions suivantes: (1) cet appareil ne doit pas causer d'interférences nuisibles et (2) cet appareil doit accepter toute interférence reçue, y compris celle qui pourrait entraîner un dysfonctionnement. MISE EN GARDE : L'émetteur a subi des tests et est conforme aux règlements de la FCC et d'ISDE. Les changements ou modifications non approuvés explicitement par la partie responsable de la conformité pourraient rendre caduque l'autorisation de l'utilisateur de se servir du dispositif.
Cet appareil est conforme aux limites d'exposition aux radiations de la FCC et d'ISDE établies pour un environnement non contrôlé. Les utilisateurs finaux doivent respecter les instructions d'utilisation spécifiques pour satisfaire aux exigences de conformité aux expositions de RF. L'émetteur doit se trouver à 20 cm au minimum de l'utilisateur et ne doit pas être situé au même endroit que tout autre émetteur ou antenne ni fonctionner avec un autre émetteur ou antenne.
Mejico
La operación de este equipo está sujeta a las siguientes dos condiciones: (1) es posible que este equipo o dispositivo pueda no causar interferencia dañina, y (2) este dispositivo o dispositivos deben aceptar cualquier interferencia, que incluye la interferencia que puede causar su operación no deseada.
HomeLink 5 Programming Flow Chart
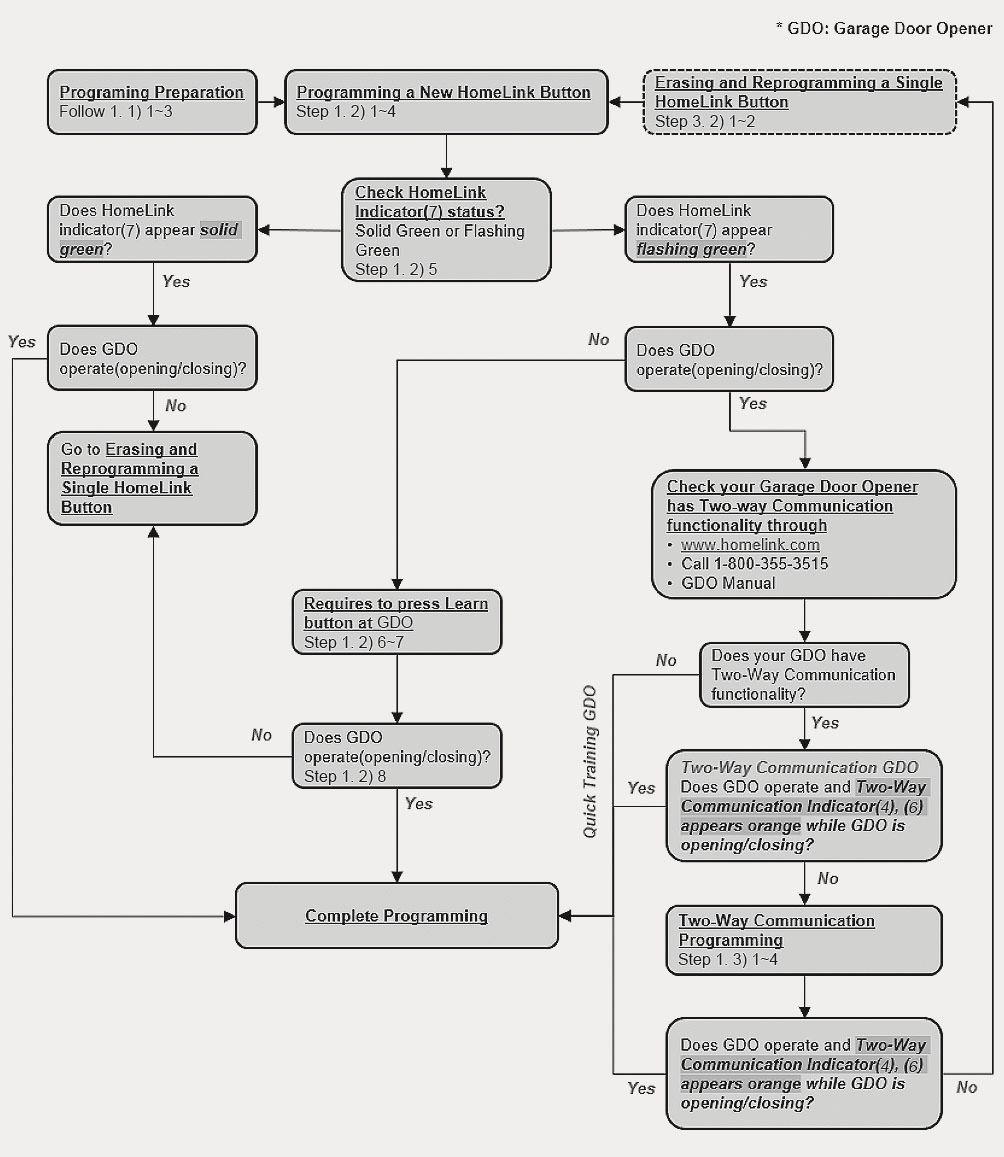
1C_ECMHomelinkFlowChart